Maintenance: How to Fix a Slow Water Supply from a Tankless Water Heater (Gas or Electric)

If you want your tankless water heater to flow like a Swedish river, follow our guide below.

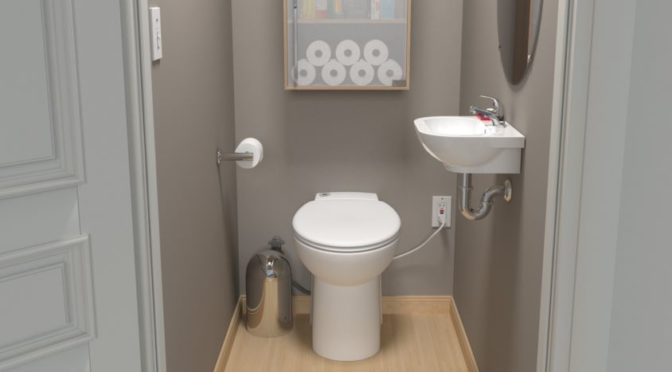
Tankless water heaters, like any other household device, are prone to reduced performance over time due to a variety of factors. We typically find that the quality of the incoming water (i.e., the water you receive from the city if you’re connected to a municipal system or the water you receive from a well or rainwater if you’re in a rural environment) has a lot to do with how quickly you experience flow issues.  If your tankless water heater isn’t giving you the water flow rate it used to when you installed it, you might need to flush the system. If you’re short on time or are afraid of tampering with electricity, you can hire a plumber, but it’s also more than possible to perform a simple tankless water heater flush on your own. We’ll go into how to do this in the section below. However, before describing the flushing process, let’s have a quick review of why flash water heaters tend to slow down to begin with.

Why do tankless water heaters slow down over time?

A small sump pump is a cheap and effective way to clean out your tankless water heater.

It’s important to remember that tankless water heaters don’t stop working without reason (well, the good models, anyway); if your water supply starts slowing down over time, it’s almost certainly going to be due to a poor water supply. Because instantaneous water heaters pump water at high pressures through small openings, you need decent-to high-quality water; naturally, the cleaner your water supply, the less likely you’ll be to have scaling (calcium and magnesium deposits) or microscopic sediment such as gravel, rocks, sand, or other particulates clog the apertures within your on-demand heater.

As a result, you’ll want to install a hard water softener upstream of your continuous water heater (i.e., in the water line that goes *to* your water heater) if you don’t already have one installed. A threshold we frequently recommend for installation is a local water hardness of 7 grains per gallon (gpg) or more, which translates to a ppm of 120 parts per million (ppm) or milligrams per liter (mg/l) or more. We have a local water hardness of 25(!) which is why we invested in a high quality water softener for our home and make similar recommendations for anyone in our area (the Chicago suburbs).

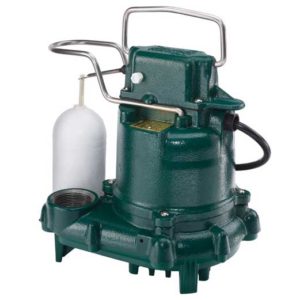
Now that we’ve covered why you’re likely experiencing a water slowdown in your tankless water heater, here’s how to fix it. You’ll probably need to do this on an interval between ever 6 months and every 2 years. To flush your heater you’ll need a small submersible sump pump (e.g., the Zoeller M53 or Wayne CDU980E), a 3-5 gallon bucket, a pair of hoses, and 3 gallons of vinegar (we prefer white vinegar).

Shut off all relevant power and fuel supplies

Before doing anything involving electricity and water, it’s essential to turn off both. That means turning off your water at the inlet and outlet valves for starters. If you’ve got a gas-powered tankless heater, you’ll also want to turn off your gas via a gas valve and either unplug the electrical power source or simply go to the circuit breaker the heater is connected to and turn off the relevant circuits. If you have an electric tankless heater, you’ll either want to turn off your 240-volt circuit breaker or find the disconnect switch on your electric sub panel and turn it off there. Finally, you’ll also want to let out the water pressure by pulling out the tab or switch in your unit’s pressure relief valve.

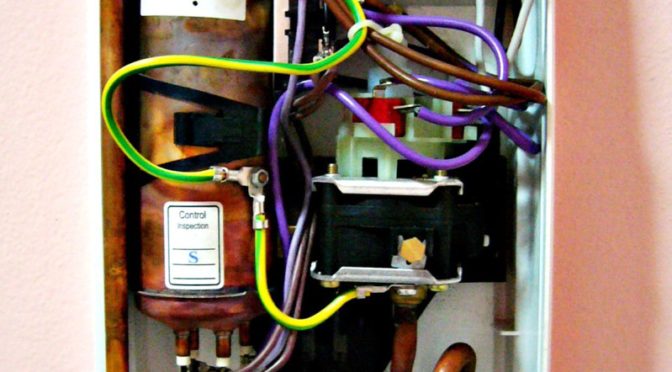
Remove the outer cover of the tankless water heater
Opening up a tankless water heater can be scary, but we promise they don't bite.
Opening up a tankless water heater can be scary, but we promise they don’t bite.

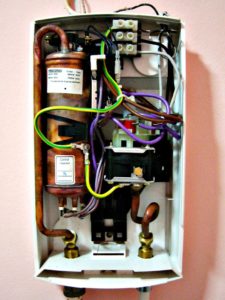
Depending on which kind of tankless water heater you have, the cover will disconnect somewhat differently, but there will typically be snaps (if you’re lucky) or a set of screws around the perimeter. You might need to wiggle the lid back and forth or lift it upward, sideways, or even slide it downward and out to disconnect it. Each cover is different, and reviewing your manual will be the quickest way to figure out how to open it (because you’ll need to open it from time to time to change the inline filter anyway).

Be on the lookout for proprietary or Torx-type screws, as these may require more specialized tools to open. Remove the cover carefully to avoid disconnecting any wires that may be connected to it internally and be sure to keep track of all relevant screws.

Fill the bucket with white vinegar and immerse the sump pump

First fill the bucket with 2 gallons of white vinegar; the mild acidity in the vinegar will help clean your lines out without damaging them or leaving residue. You’ll want to connect one hose to the heater inlet on one end and the sump pump on the other. The second hose will run from the water heater’s pressure-relief valve on one end to your vinegar bucket. Turn on or plug in your sump pump and let it run your vinegar infusion through your heater; we typically have it run for about 15 minutes, but if you’ve got a lot of scaling (the calcium and mineral deposits that make up hard water), you can let it run for up to 30 minutes.

Turn off the pump and clean the inline filter

Once enough time has run by, you’ll want to turn off your sump pump. Disconnect the housing that keeps the inline (screen) filter for your tankless water heater. The precise location will vary significantly from one water heater to the next, but it will typically be located just beside the water inlet, since this is the first line of defense of the water heater against the sediment we’re trying to flush out. Remove the screen filter carefully and clean it thoroughly with clean running water. If you can replace it, that’s even better, but if you can’t, you can put the same one back in. Keep in mind that a brand new filter will do a much better job at keeping your water flow healthy than a used and dirty one. At the same time, don’t get tempted to leave it out if you can’t replace it; a bad filter is better than no filter at all, and many tankless water heaters won’t run without one installed.

Remove the pump from the bucket

With a bit of luck, the next time you run water heated by your tankless heater, you should no longer experience any disruption in the water flow rate. However, it’s important to remember that there are many different kinds of tankless heaters out there, and the steps we outlined above aren’t going to be a cure-all for all of them. Furthermore, if the steps above do work for your particular setup, keep in mind that you will likely need to repeat them every 6 months to 2 years, depending on how frequently you experience a drop in water flow.

You’ll wan to err on the side of caution and perform the procedure more frequently over less, as if you put it off for too long, you can reach a point where your tankless heater’s piping becomes too clogged to clean through a basic approach like this. At that point, you might need to call in a professional. The biggest preventative tool you can install to reduce the rate at which you need to flush your heater and the risk of having a highly clogged one is to make sure you’re using a good water softener upstream, and to keep it stocked with the salt it needs to work.

If you find our work at PumpThatSump helpful, you can support our relentless reviewing of every sump pump on the market by shopping via our Amazon link for whatever you need to make your house a home. Despite being self-employed, we promise not to spend it all on health insurance.

Saniflo 023 Sanicompact Toilet and Built-In Macerator Review and Saniaccess 2 Comparison

If you’re remodeling your basement and want to add a half bathroom to it or renovate an existing one, you’re going to have your work cut out for you. Because a basement-level bathroom won’t be able to gravity-drain into your sewer line or soil stack, you’re either going to need to buy and install a sewage pump (which might be an ejector pump or a grinder pump, depending on your needs) or you’re going to need a macerating pump and toilet. A standalone sewage pump will be far more powerful and allow you to handle a greater amount of solids and wastewater than a macerating toilet, but you’re also going to spend much more money buying and installing it. And if you’re already spending several thousand dollars on a half or full bathroom, you’re probably not looking to spend more additional money than necessary.

A macerator pump, however, can be installed for much less in many cases, as you frequently won’t need to tear up concrete flooring the way you would with a sewage pump. This means a faster installation for you or your plumber and less money spent on the project. While you can buy a separate macerator pump and connect it to just about any toilet, we typically recommend buying it with a toilet kit to get rid of compatibility issues. We recently reviewed the Saniflo Saniaccess 2 Upflush Macerator Pump and Toilet as well as the Liberty Pumps Ascent II Macerating Toilet Kit, and preferred the Saniflo due to its greater reliability. Today we’ll review another Saniflo, the Saniflo 023 Sanicompact 48 One piece Toilet with Built-in Macerator. It’s basically a compact, tankless macerating toilet that works well in small spaces and for people with physical limitations or a desire to minimize water consumption. Our full review is below, and you can buy it here. Canadians can buy it here

Key Features of the Saniflo Sanicompact Macerating Toilet (60 Second Summary)

The Saniflo Sanicompact Macerating Toilet is, at its core, a toilet with a built-in miniature sewage grinder pump. Made for use in both residential environments requiring half bathrooms, it’s most frequently used to install toilets and sinks in below-grade settings like basements where gravity drains to sewer lines aren’t available. The system can pump sewage up to 9 feet vertically or up to 120 feet to a soil stack with a required gravity fall of 1/4 foot per horizontal foot. Saniflo explicitly notes it’s capable of handling wastewater effluent from both a toilet and a sink (i.e., a half bath). The system weighs 67 pounds and the macerator features a .3 horsepower, 110-115V, 60Hz 7.2 amp motor. The toilet is 18-1/2″ tall, 21-1/2″ long, and the toilet lid is 14-1/2″ wide.

The china toilet bowl has a macerator pump built into it and as a result doesn’t require a gravity flow tank; the flush and pump cycle occurs after pushing a button on the toilet bowl, and water is sent through the bowl while the macerator and pump handle waste and paper. There is a 10-15 second cycle for the motor before the bowl is refilled with fresh water. A dual flush feature is present via a dual push button to choose between 1.28 gallons per flush (gpf) and 1 gpf. The macerator blades turn at 3,600 RPM and the discharge elbow behind the system can be rotated a full 360 degrees for installation compatibility. It includes a non-return valve to prevent backflow. The toilet does not require venting (connection to a vent stack) as it is a forced main; it’s important to note you might still need to vent additional fixtures if connected to the toilet.

Saniflo Sanicompact Macerating Toilet and Saniaccess 2, Liberty Pumps Ascent II Comparison

Compared to the Saniaccess 2 and Ascent II, the primary advantages of the Sanicompact are twofold: First, it’s far more compact, allowing for a cleaner installation in smaller spaces. Second, it doesn’t require venting, although any additional fixtures you install and connect to it (e.g., a shower, bath tub, or sink) might require venting.

Compared to the Ascent II, it’s doesn’t pump to as much head or as far horizontally, but it has much stronger reviews from clients and is likely to be the more reliable toilet over the long term, which means significantly less cost over time and significantly more peace of mind. Compared to the Saniaccess 2, it also has less head and less horizontal pumping power, but it has the advantage of being a lighter unit and one easier to use for individuals with physical limitations, as there isn’t a tank to avoid behind the toilet and the push button flush system is easier to manipulate than a typical flusher. It’s also more water efficient due to the dual flush option.

Our Long and Short Term Experiences Installing and Using the Saniflo Sanicompact Macerating Toilet

Installing the Sanicompact isn’t different from the installation of any other macerating toilet, and it’s definitely simpler than the work needed to install a sewage pump. The amount of time it takes will depend on your plumbing experience and pre-existing plumbing environment. If you have previous experience installing toilets and macerator pumps or sewage pumps, there won’t be any surprises. Otherwise, you might want to order the toilet and call in a professional, especially if you’re in a hurry to get it installed.

The basic installation steps are a bit simpler than those of most macerating toilets since the macerator is already connected and since there isn’t a venting requirement: connect the toilet to your water supply and connect the pump to your discharge line, plugging in the toilet with a Ground Fault Interrupt (GFI) circuit once you’ve bolted everything down.

The toilet itself can be installed in a range of areas, making it a convenient little toilet for individuals and families who’d like to put one in a loft or attic, a garage, an upper floor, the ground floor, or of course, a basement. When installing it, you might want to consider adding some insulation to the area (e.g., in the walls) since the macerator can a bit noisier than a normal toilet flush. However, most clients don’t seem to be bothered by the flush, so  this is primarily up to user preferences. A number of clients find it quieter than a normal toilet.

Troubleshooting and Installation Tips to Get Your Saniflo Sanicompact Macerating Toilet Working Sooner

When the toilet arrives, once you’ve unpacked it and made sure that all components are present, double check the screws and hex clamps for tightness, as if they’re loose, which can occur from the overseas shipping (many units ship from France), the toilet can end up leaking whenever the pump starts (which is whenever you flush). Additionally, you’ll have an easier time with the toilet seat if you line it up the toilet seat pins ahead of time.

While not necessary for the installation, we’d highly suggest adding a ball valve to your 1″ water supply line as close to the toilet as you can; this will let you shut off water to the toilet without needing to shut it off to your home if you need to pull out the toilet or service it.

Beyond these tips, the biggest advantage of a good macerating toilet over a sewage pump is the fact that you probably won’t need to rip out a lot of concrete to get it installed. The unit has very few moving parts and isn’t likely to need maintenance throughout its lifetime. Perhaps the most significant thing to keep in mind is that you don’t want to lean back on the toilet lid; because there’s no tank behind it, there’s nothing to support it, and it can break if you put too much pressure on it.

Saniflo Sanicompact Macerating Toilet Pros, Cons, and Value Comparison

In conclusion, if you’re looking for a compact macerating toilet, the Saniflo Sanicompact is one of the best on the market for under $1,000. It’s quiet, fast, efficient, and reliable while remaining relatively easy to install. It’s not going to be as cheap as a regular toilet, but if you need to add a toilet to your basement or are planning a half bath addition, you’re going to save a lot of money by installing a macerating toilet over a dedicated sewage pump. While a full sewage pump will give you much more power and the ability to handle an entire home or buliding’s worth of sewage,  if you can meet your needs with a macerating toilet instead, it’s worth considering. And between the Saniaccess 2 and the Sanicompact, we’d suggest the Sanicompact if you’re working with limited space and the Saniaccess 2 if you need a bit more pumping power.

You can buy the Saniflo Sanicompact Macerating Toilet here on Amazon. You can buy the Saniflo Saniaccess 2 Macerator Pump and Toilet here.

Canadians can buy the Saniflo Sanicompact 48 here on Amazon.

If you find our work at PumpThatSump helpful, you can put our relentless reviewing of every pump and fixture on the market to the test by shopping via our links above for whatever you need to make your house a home. Despite being self-employed, we promise not to spend it all on health insurance.

We share best practices in pump and fixture selection, installation, and maintenance for families and small business owners who want water (or worse) gone for good.