Replacing or Installing a New Toilet: An Easy DIY Guide

Replacing or Installing a New Toilet: An Easy DIY Guide
We walk you through how to replace or install a new toilet without going to plumbing school.

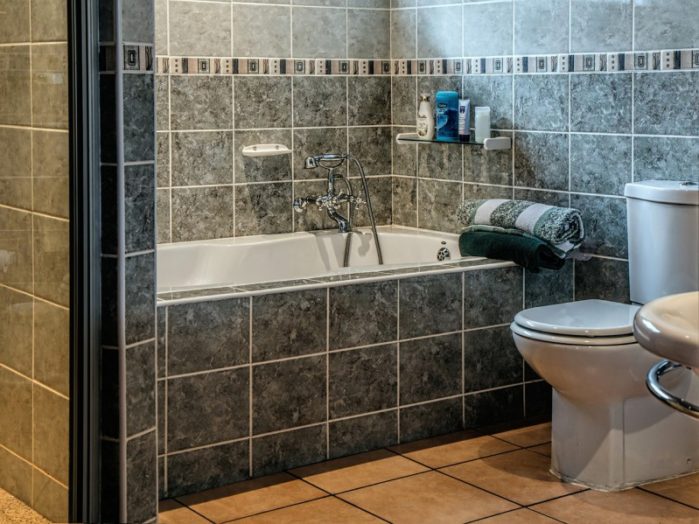
Unless you enjoy calling plumbers and paying high hourly rates, there are a lot of plumbing jobs you can get done on your own with a bit of reading, a bit of courage, and a lot of time. Replacing or installing a new toilet is one of them, except it’s not going to take you much time at all, even if you’re new. Here’s a guide to easily installing a new toilet in your bathroom, whether to replace a broken one or to simply upgrade an existing one in looks and energy efficiency. We’ll also cover recommendations and special tips for replacing macerating toilets in below-grade, basement bathrooms.

Turn off your water and remove the old toilet

Replacing or Installing a New Toilet: An Easy DIY Guide
Most of the advice here applies equally to regular and macerating toilets. Keep in mind that you’ll need a macerating toilet if you’re installing a toilet in a basement bathroom in most cases.

The first step is to turn off the water supply going to your toilet. There will typically be a shut-off valve behind the toilet, but if you can’t find one or if it wasn’t installed, you can shut off your water main; this will be in your basement if you have one or in a plumbing closet. You can follow your water heater to find it if necessary.

Once your water’s off, flush the toilet, holding the flusher down until there’s no more water in the bowl or reservoir. You’ll want to use a bucket and a sponge to soak up any remaining water so it doesn’t drip everywhere. If you have a macerating toilet, unplug it once you’re done flushing. Disconnect your toilet tank from your water line and unscrew the nuts on your toilet’s closet bolts; these are the bolts at the base of the toilet that connect your toilet to your floor. Lift the toilet up with the help of a friend and remove it carefully.

Remove the old wax ring and measure for a new toilet

With the toilet out of the way, cover the exposed drain so sewer gases from your pipes don’t enter your home. Clear out the wax ring with a putty knife; you won’t reuse it. Also make sure the closet flange is still in good condition; if it looks like it has worn down or begun to rust, replace it.

Use a tape measure to measure the distance from your closet bolts to the walls beside and behind your toilet; these measurements will give you an idea of the size of the replacement toilet you need, presuming you haven’t already chosen one. If you’re replacing a macerating toilet, keep in mind that you’ll need another; a regular toilet won’t be able to pump sewage against gravity.

Install the new toilet (but don’t over tighten it)

Connect your flange to the closet bolts for your new toilet and make sure each is aligned with your toilet’s holes. Rest the toilet upside down and carefully align a new wax ring over the base. Place your toilet on the drain, making sure to align your closet bolts. Be sure to press firmly in order to make a seal that’s watertight, or you’ll face a risk of leaks later on. Attach the nuts, washer, and cap base to your closet bolts and tighten everything down.

Make sure you don’t over tighten your bolts; this can lead to a cracked toilet, which you’ll then need to replace. Cover your closet bolts with caps. If any bolts are too long, you’ll need to cut them with a hacksaw. If your toilet is a two-piece model, install the bowl at this point. Typically the flushing components will already be assembled within the bowl. Install any necessary bolts as well as your rubber gasket and carefully set the tank on top of the toilet. Seal the two by tightening your bolts. Again, be sure not to over tighten them.

Reconnect water and check for leaks

Here’s the moment of truth. Reconnect your water line, turn it on, and look for leaks all around the toilet, particularly at the base and at the bowl. If you need to make adjustments, do so; it’s better to discover mistakes at this point than later. When the tank fills to the fill line, flush it and check the wax seal. If your toilet is leaking, shut off the water again and recheck your connections. If you don’t find any leaks, you can connect the toilet lid and use latex caulk to seal up the base of the toilet.

Know when you need professional help

While you can generally get this job done on your own with enough patience and trial and error, if you don’t feel comfortable taking it on alone and don’t have any knowledgeable friends, there’s nothing wrong with getting professional help. And if you do tackle the job on your own but can’t figure out where your toilet is leaking once you’re done with the installation, it’s important to get help. If you use a leaking or dripping toilet, you’re eventually going to either damage your bathroom, structurally speaking, or at the very least, tarnish its aesthetics. It’s particularly important to call for help if your closet flange or drains are damaged or leaking; while these jobs can be tackled without a plumber if you have enough experience, it might be a better use of your time to simply bring a plumber in instead of becoming one over the course of several weekends.

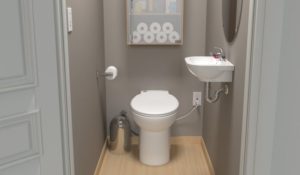
Which macerating toilets do you recommend for basement bathrooms?

Replacing or Installing a New Toilet: An Easy DIY Guide
The Saniflo Sanicompact is our top choice for a basement or below-grade toilet, as it macerates without needing venting.

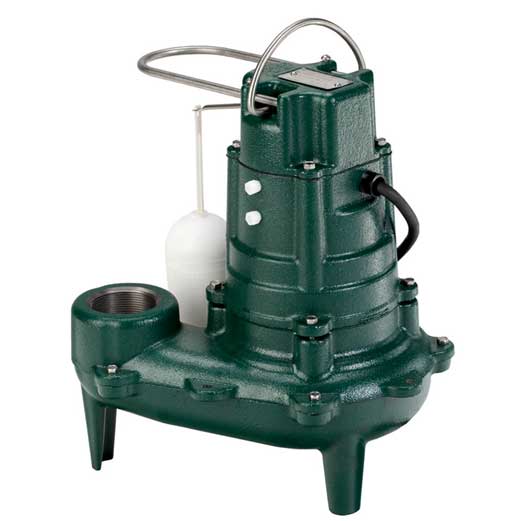
While most of the above advice applies equally to regular toilets and macerating toilets, macerators have a few unique points to keep in mind. First of all, if you’re installing one from scratch, such as in a basement bathroom addition or renovation, you’re more likely to need professional help unless your plumbing is already roughed in and you’re comfortable connecting your toilet to a discharge line and venting it. That said, there are macerators that don’t require venting, like the Saniflo Sanicompact, which we highly recommend and review here. The Saniflo Saniaccess 2 does require venting but is another excellent option for homeowners and landlords in search of a reliable macerating toilet. And of course, if you’re willing to put in a sewage pump or already have one installed, you won’t need a macerating toilet at all no matter where you set up a bathroom, as it’ll be able to pump sewage against gravity.

If you find our work at PumpThatSump helpful, you can put our relentless reviewing of every pump and fixture on the market to the test by shopping via our links above for whatever you need to make your house a home. Despite being self-employed, we promise not to spend it all on health insurance.

Easy Sump Pump Installation: How to Do It Yourself

Easy Sump Pump Installation: How to Do It Yourself
You don’t need to be a plumber to set up your own sump pump. Here’s what you need to know.

While most homeowners will call a professional  plumber to handle a sump pump installation, the truth is that you can typically get the job done on your own if you have the knowledge, the tools, and the time to do it yourself. Today we’ll look at what sump pumps are, why you want one, how to dig sump pits, and how to install the pumps themselves. We’ll also cover how to choose AC, DC, AC/DC, and water-based sump pumps simple enough to install on your own and reliable enough to work for years.

What’s a sump pump and why would you want one?

Easy Sump Pump Installation: How to Do It Yourself
While all sump pumps are a bit different, many will resemble the Zoeller M267, our favorite AC pump.

A sump pump is a essentially a water pump to carry water from one area (e.g., an excavated hole in your basement) to another (out of your home via a discharge pipe). People typically install them to keep basements dry (particularly finished or carpeted basements), since basements naturally accumulate water due to osmosis, groundwater, and soil saturation from rainfall and flooding.

Sump pumps are typically found in sump pits or basins, which themselves are usually installed beneath basement or at low points where water naturally accumulates. You can buy sump pumps in stores or online. They’re typically made of cast iron, aluminum, or plastic. They spend most of their time in dormant states, but activate when water sufficiently fills the sump pits in which they are immersed. They pump water out of the pit and out of your home and shut off automatically once water levels drop to pre-activation levels.

If you’re dealing with water problems in your basement, a sump pump is an effective, inexpensive, and easily installed tool to keep water at bay. But if you frequently deal with basement flooding, you’ll want to look into additional irrigation techniques beyond a sump pump installation.

What kinds of sump pumps are typically installed in a home?

Easy Sump Pump Installation: How to Do It Yourself
Always have a backup sump pump to support your main pump. We recommend a combination pump like the Wayne WSSM40V.

While there are lots of models on the market, nearly all sump pumps can be divided into one of four categories: AC-based sump pumps (e.g., a Zoeller M267), DC backup pumps (e.g., a Wayne WSM3300), AC/DC combination pumps (e.g., a Wayne WSSM40V), and water-based pumps (e.g., a Basepump HB1000-PRO). Most homes will use AC pumps exclusively, but we always recommend installing a backup pump that’s either DC-powered (via a deep cycle battery) or by water (which requires no electrical power in the home).

While most homeowners will call plumbers to install sump pumps, with enough motivation, a DIY-minded man or woman can also get the job done. If you’re set on installing your sump pump independently, you’ll want to budget at least $300 to $600 for materials (e.g., the pump, pipes, connectors, tools) as well as a weekend to get the job done from start to finish.

How do you dig and set up a sump pit or basin?

Easy Sump Pump Installation: How to Do It Yourself
If you’re going to use a jackhammer more than once, the XtremepowerUS-2200watt is a cheap and reliable electric model.

The first step is to set up the sump basin in your basement. Once you’ve bought a sump basin, you’ll need to buy, rent or borrow a jackhammer to open up the concrete flooring so you can dig the pit. If you already have a sump basin, of course, you can skip this step. Otherwise, rent an electric jackhammer from a hardware store, make sure it has a flat spade bit, don your eye, ear, and hand protection, and get to work. If you want a cheap electric jackhammer to keep around the house for multiple projects, we recommend the Xtremepower US 2200 watt.

Before digging, though, you’ll want to draw a circle around your sump basin to mark where you’re going to dig. Your basin should be upside down because it’s going to be wider at the entry, and you’ll need a hole big enough for it to fit easily. Also make sure your circle is at least 4, but no more than 6, inches around your basin. Keep at least a foot away from your basement walls so you don’t hit your foundation footing. With the jackhammer, follow the circle you’ve drawn to break through your concrete floor.

Once you’ve cleared the concrete, you’ll want to dig a hole deep enough to fit your sump basin completely inside; measure the basin beforehand to get the correct height, or simply try it in the hole as you dig. There will be gaps around the basin when it’s in the hole; use gravel to fill those in. You’ll want to level the gravel with a full inch of height above your basement level and then use concrete to fill the remaining gap. Use a trowel to smooth the concrete and let it set for a minimum of 24 hours.

How do you install the sump pump itself?

To install the pump, you’ll naturally want to follow the directions in the manual above all. However, if it’s an electric pump, you’ll generally place it in the basin once the concrete is set. If you’re setting up a water-based pump, it’ll need to tie into your water main to receive the water that powers it. Set up the check valve, inlet pipe, and discharge pipe if it isn’t already in place, and drill a hole in your rim joist so you can run the pipe out of your home.

Continue running the pipe until it’s positioned so water drains downstream of your foundation. Avoid discharging into a septic or sewer system without double-checking to ensure that you’re allowed to do so in your local building code. If you can’t get a good grade away from your home, it might be necessary to install a drywell and empty your discharge pipe into it.

Once the hole is set, seal it with caulk. Plug your pump in using a ground fault circuit interrupter, or GFCI outlet. Test the pump by using a garden hose or bucket to fill the pit with water. Follow a maintenance schedule to test your pump periodically to make sure it works when you need it to.

Which AC, DC, and water-backup sump pumps are easiest to install?

Easy Sump Pump Installation: How to Do It Yourself
The Basepump HB1000-PRO is a good example of a reliable and easy-setup water-based sump pump.

If you’re going to install a sump pump, you might as well make it easy on yourself . The following suggestions are reliable, easy to set up, and will also result in less time on the job for the plumber you call if things go wrong. For an AC pump, we’d recommend buying the Zoeller M267, which we’ve reviewed here and would trust to keep any basement dry. If you want a DC-only backup, choose the Wayne WSM3300, which we’ve reviewed here; it’s practically a drop-in installation. For an AC/DC combo, the Wayne WSSM40V, which we’ve reviewed here. And for the ultimate reliability, skip electricity entirely for a water-based sump pump like the Basepump HB1000-PRO, which we’ve reviewed here.

If you find our work at PumpThatSump helpful, you can put our relentless reviewing of every pump and fixture on the market to the test by shopping via our links above for whatever you need to make your house a home. Despite being self-employed, we promise not to spend it all on health insurance.

We share best practices in pump and fixture selection, installation, and maintenance for families and small business owners who want water (or worse) gone for good.